

Choosing the Right Wall Cladding Materials for DIY Projects
Overview of Common Wall Cladding Materials
Choosing the right wall cladding materials for your DIY project can transform a mundane space into a stunning sanctuary. As more homeowners embrace wall cladding DIY, understanding the array of options available becomes essential. Each material carries its own story—its texture, durability, and aesthetic appeal—allowing you to craft a space that echoes your personal style.
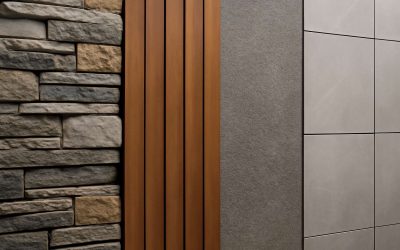
Natural materials like stone and timber evoke a timeless elegance, while modern options such as composite panels and vinyl offer affordability and ease of installation. For those seeking a contemporary flair, metal cladding introduces an industrial charm that can elevate any interior or exterior wall. To make an informed choice, consider factors like climate resilience, maintenance, and the desired visual impact. Here are some common wall cladding materials perfect for DIY enthusiasts:
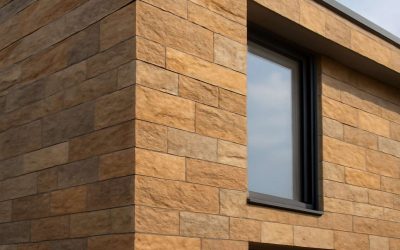
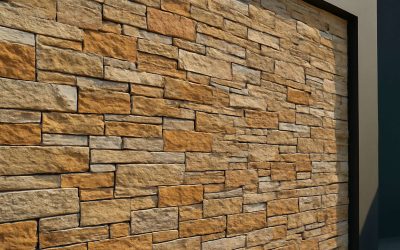
- Natural Stone – rugged durability and organic beauty
- Timber – warmth and classic appeal
- Vinyl – versatile and budget-friendly
- Composite Panels – lightweight and modern
- Metal Cladding – sleek, industrial sophistication
With these options in mind, your wall cladding DIY journey promises a rewarding blend of creativity and craftsmanship, ultimately revealing a space that’s uniquely yours in the heart of South Africa’s vibrant landscape.
Factors to Consider When Selecting Materials
Choosing the right wall cladding DIY project isn’t just about aesthetics; it’s a strategic decision that can dramatically influence the longevity and overall vibe of your space. In South Africa’s diverse climate, selecting materials that withstand sun, rain, and temperature fluctuations is crucial. A misstep here could mean costly repairs or constant maintenance.
Factors such as durability, ease of installation, and visual harmony should guide your choice. For instance, natural stone offers rugged resilience and timeless appeal, while vinyl provides a budget-friendly, low-maintenance solution. Understanding these elements helps you craft a space that’s not only beautiful but also practical for everyday living. Sometimes, a simple list can help clarify your priorities:
- Climate suitability
- Ease of installation
- Maintenance requirements
- Visual impact and personal style
By weighing these considerations, your wall cladding DIY journey transforms from a mere project into an immersive experience of creativity and craftsmanship. It’s about creating a space that reflects your personality while standing the test of time in South Africa’s vibrant environment.
Tools and Supplies Needed for Wall Cladding DIY
Essential Tools
In the shadowed realm of wall cladding diy, possessing the right tools transforms a mundane task into a ritual of mastery. A well-equipped workshop is the gateway to unlocking the secrets of creating a space that whispers tales of elegance and resilience. Without these essential implements, even the most ambitious project risks falling into chaos, like a ghost lost in the darkness.
To embark on this clandestine journey, gather a selection of steadfast tools. A quality utility knife becomes your blade of choice, slicing through materials with ghostly precision. A spirit level ensures your work remains true, avoiding the spectral distortion of crooked lines. A sturdy measuring tape guides your hand, anchoring your vision in reality.
For those seeking to elevate their wall cladding diy endeavors, consider these supplies:
- Heavy-duty adhesive suitable for various cladding materials
- Sandpaper or a power sander to prepare surfaces with ghostly smoothness
- Sealant for sealing edges and ensuring longevity against the elements
With these tools and supplies in hand, the act of transforming walls into gothic masterpieces becomes a dance with the shadows—an art form born of patience, precision, and a touch of the mysterious. The dark allure of wall cladding diy beckons those brave enough to wield these implements and craft their own sanctuary of style and substance.
Additional Supplies
Embarking on a wall cladding diy project demands more than just enthusiasm; it requires the right supplies to ensure a seamless finish. While the core tools set the foundation, additional supplies elevate your craftsmanship and guarantee durability. High-quality heavy-duty adhesive, for example, is crucial for bonding various cladding materials securely to your wall surface. Without it, even the most skilled DIYer risks compromised results.
Preparation is key—rough surfaces must be smooth, which makes sandpaper or a power sander indispensable. These tools help create a ghostly smooth surface, ready for cladding installation. Sealant also plays a pivotal role, sealing edges and preventing moisture ingress, especially in South Africa’s diverse climate zones. These supplies work in harmony, transforming a simple wall into a masterpiece of style and resilience.
- Heavy-duty adhesive suitable for different cladding materials
- Sandpaper or a power sander for surface preparation
- Sealant to protect edges and enhance longevity
The right selection of supplies ensures your wall cladding diy project not only looks stunning but withstands the test of time. Each element—whether adhesive, sealant, or preparation tools—contributes to a flawless finish and a lasting result that whispers of craftsmanship and care.
Preparing Your Wall for Cladding Installation
Cleaning and Surface Preparation
Before embarking on your wall cladding diy project, the importance of thorough surface preparation cannot be overstated. A pristine, smooth wall acts as the foundation for a flawless finish, ensuring your cladding adheres securely and looks professional. Neglecting this step can lead to peeling, bubbling, or even structural issues down the line—an outcome no DIY enthusiast wants to face.
Start by removing any loose paint, wallpaper, or debris with a sturdy scraper and a gentle cleaning solution. Dust and dirt are silent enemies that can compromise adhesion; a damp cloth or sponge works wonders here. For uneven surfaces or minor imperfections, a quick skim with fine-grit sandpaper can create a uniform canvas, enhancing the durability of your wall cladding diy efforts.
Once cleaned and smoothed, it’s vital to prime the wall—especially if you’re working with porous materials or painted surfaces. This step seals the surface, improves bonding, and ultimately ensures your cladding stays intact for years to come. Remember, a well-prepared wall is the secret behind a successful installation—trust the process, and your wall cladding diy will come to life with a professional finish that stands the test of time!
Measuring and Marking
Accurate measuring and precise marking are the backbone of any successful wall cladding diy project. A single misstep can throw off the entire installation, leading to uneven finishes and wasted materials. Start by measuring the wall’s dimensions carefully, noting any irregularities or obstacles that might impact your layout. Use a reliable level and a pencil for marking reference points, ensuring your lines are straight and consistent.
For optimal results, consider marking grid lines or reference points to help align your cladding panels perfectly. This step isn’t just about aesthetics; it’s about creating a durable, professional-looking finish that lasts. Remember, taking the time to measure and mark meticulously saves frustration later and guarantees a seamless, polished result for your wall cladding diy project. Proper preparation here transforms your vision into reality, with every panel fitting precisely as planned!
Acclimating Materials
Before embarking on your wall cladding diy adventure, it’s essential to prepare the battleground. Acclimating your chosen materials ensures they respond naturally to the environment, preventing warping or cracking later on. This process involves storing the cladding panels in the same room as the installation site, ideally for at least 48 hours. Such patience allows the materials to reach ambient temperature and humidity levels, a crucial step in achieving a flawless finish.
As you prepare, inspect your wall thoroughly. Remove any loose paint, dust, or debris, for a surface that’s as smooth as a calm lake. A clean, dry surface not only enhances adhesion but also reduces the risk of future damage. For added precision, consider marking reference lines directly onto the wall—these will guide your alignment and keep each panel perfectly in place during your wall cladding diy project.
Remember, the magic of a successful wall cladding diy lies in meticulous preparation. This foundational step transforms raw materials into a harmonious tapestry, ready to showcase your craftsmanship and elevate your space to new heights of elegance and durability!
Step-by-step Guide to Installing Wall Cladding Yourself
Dry Fitting and Planning Layout
Embarking on a wall cladding DIY adventure transforms a plain space into a captivating showcase of style and craftsmanship. Before you commit to installation, it’s essential to dry fit your materials—think of it as a rehearsal before the grand performance. Carefully arrange your wall cladding without adhesive, ensuring each piece aligns perfectly and complements the overall layout. This step allows you to catch any miscalculations early and visualize the finished effect, saving time and frustration later.
Next, planning your layout becomes an immersive journey of design discovery. Decide on a pattern or orientation that enhances the room’s character—whether running vertically to elongate the space or horizontally for a cozy feel. Mark the position of each panel with a pencil, maintaining a consistent gap for grout or joint filler. For a seamless installation, consider starting from the centre or a focal point, working outward with patience and precision.
- Begin by laying out the panels on the floor, experimenting with arrangements.
- Use a chalk line or laser level to create reference points on the wall for alignment.
- Carefully measure and mark the placement, considering cuts and edges.
With your layout meticulously planned and dry fitted, you’re ready to transition from visualization to real installation—an exhilarating step in your wall cladding DIY journey that promises a stunning transformation.
Mounting the Cladding
Once you’ve finalized your layout and are confident in your dry fit, it’s time to begin the wall cladding DIY installation. Precision and patience are your best allies here. Start by measuring and marking the wall to ensure your panels align perfectly—this step helps prevent costly mistakes down the line. Using a level or chalk line, create clear guiding lines to keep your cladding straight and uniform throughout the process.
When mounting the panels, apply adhesive evenly onto the back of each piece, taking care to follow the manufacturer’s instructions for your chosen wall cladding material. Firmly press each panel into place, ensuring it adheres well and remains flush with adjacent tiles. For added stability, especially for heavier cladding options, consider using nails or screws in conjunction with adhesive. This dual approach guarantees longevity and a seamless finish for your wall cladding DIY project.
Remember, working systematically from the bottom to the top minimizes errors and helps maintain a tidy appearance. Take your time to check alignment regularly, and don’t rush the process. With each panel securely mounted, your space begins its transformation—proof that an eye for detail makes all the difference in successful wall cladding DIY endeavors!
Finishing Touches
As your wall transformation nears completion, the finishing touches are where your vision truly comes to life. The final step in your wall cladding diy journey is about refining the details—ensuring every panel aligns perfectly and the entire surface radiates seamless elegance. This phase demands a delicate touch and an eye for detail, like an artist adding the final brushstrokes to a masterpiece.
Begin by inspecting each mounted panel, making minor adjustments to achieve a flush, uniform appearance. Small gaps or uneven edges can mar the overall aesthetic, so patience is key. To secure heavier cladding materials, consider using nails or screws in conjunction with adhesive—this dual approach guarantees stability and longevity. Remember, working from the bottom upwards creates a stable foundation, helping to maintain straight lines and prevent slipping of panels.
Once all panels are securely in place, the finishing touches involve sealing joints and edges with caulk or sealant. This not only enhances water resistance but also elevates the visual appeal, giving your wall a polished, professional look. For a bit of extra flair, you might add decorative trims or edging strips, framing your wall cladding diy masterpiece with a refined border. The result? A stunning, bespoke wall that reflects your craftsmanship and imagination, standing as a testament to your dedication to creating a space that’s uniquely yours.
Tips and Tricks for a Professional-Looking DIY Wall Cladding
Common Installation Mistakes to Avoid
Embarking on a wall cladding DIY project can feel like stepping into a world of endless design possibilities — until that little voice of doubt whispers, “Are you doing this right?” Fear not, brave renovator! The secret to a professional-looking finish lies in dodging a few common installation pitfalls. For starters, uneven surfaces are the arch-nemeses of seamless wall cladding diy. A quick, thorough surface prep—think sanding and patching—can save you from wobbly tiles or warped panels. Remember, patience is your best friend, especially when it comes to measuring and cutting. Rushing these steps often results in awkward gaps or misaligned edges, turning your masterpiece into a DIY disaster.
- Skipping the surface preparation
- Misjudging the spacing or alignment
- Using inappropriate adhesives or tools
- Ignoring the manufacturer’s instructions
A wise DIYer also knows that a little extra time spent double-checking measurements and dry-fitting panels can prevent costly mistakes. After all, wall cladding diy isn’t about speed; it’s about precision, patience, and a dash of creative flair.”
Maintaining and Caring for Your Wall Cladding
Achieving a professional finish in your wall cladding diy project hinges on more than just the initial installation; it’s about the ongoing care that preserves its aesthetic appeal and structural integrity. A well-maintained wall cladding can last for years, elevating your space with minimal fuss. The first step is to keep the surface clean—regular dusting and gentle cleaning with non-abrasive solutions prevent dirt buildup that can compromise the material’s lifespan. For more stubborn stains, a mixture of mild detergent and water is often sufficient, but always check the manufacturer’s recommendations for specific wall cladding materials.
To enhance longevity, consider applying a protective sealant tailored to your chosen material. This extra layer guards against moisture, which is especially pertinent in South Africa’s diverse climate zones. When inspecting your wall cladding diy, look out for signs of damage such as cracks or loose panels. Prompt repairs not only restore visual harmony but also prevent further deterioration. Remember, the key to maintaining a flawless finish lies in consistent, gentle upkeep that respects the craftsmanship of your project.
Enhancing Aesthetics with Finishing Details
When it comes to elevating your space with wall cladding DIY projects, the devil truly is in the details. A professional-looking finish doesn’t have to be reserved for the pros—small finishing touches can make your DIY wall cladding project look like it was crafted by a seasoned artisan. Think of these as the cherry on top of your decorative cake: subtle but impactful.
One trick is to pay close attention to the edges and joints. Using a high-quality sealant or caulking around panels not only creates a seamless look but also prevents moisture ingress—crucial for South Africa’s varied climate. For an extra touch of finesse, consider adding decorative trims or corner beads that complement your chosen wall cladding material. These details frame the installation beautifully and hide any minor imperfections.
To truly enhance aesthetics, embrace the power of lighting. Spotlights or wall-mounted LEDs can cast dramatic shadows and highlight textures, transforming your wall cladding DIY into a showstopper. Remember, sometimes less is more—subtle finishing details and thoughtful lighting turn a simple wall into a piece of art. Keep these tips in mind, and your project will not only look professional but also stand the test of time with flair.
Safety and Environmental Considerations for DIY Wall Cladding
Safety Precautions During Installation
Embarking on a wall cladding DIY adventure is thrilling, but safety should always be your steadfast companion. The last thing you want is an accident that dampens your creative spirit! When handling tools like saws, drills, and adhesives, protective gear isn’t just a recommendation—it’s a necessity. Safety glasses guard against flying debris, while gloves shield your hands from splinters and sharp edges. Proper ventilation is equally vital, especially when working with adhesives or paints, to prevent inhalation of harmful fumes.
Environmental considerations also play a pivotal role in your DIY journey. Opting for eco-friendly materials and non-toxic adhesives minimizes your carbon footprint and ensures safety for your household. During installation, be mindful of waste disposal—recycling packaging and leftover materials reduces environmental impact. When selecting wall cladding DIY materials, choose options with sustainable certifications or those crafted from recycled content to align your project with eco-conscious practices.
- Always work in well-lit, ventilated areas.
- Wear appropriate protective gear at all times.
- Handle tools with care, following manufacturer instructions.
- Dispose of waste responsibly, prioritizing recyclable materials.
By maintaining safety and environmental mindfulness, your wall cladding DIY project transforms from mere renovation into a sustainable act of craftsmanship. Safety isn’t just an afterthought—it’s the foundation of every successful, eco-friendly wall transformation.
Environmental Impact and Sustainability
Embarking on a wall cladding DIY project isn’t just about transforming your space; it’s an opportunity to make eco-conscious choices that benefit both your home and the planet. With South Africa’s increasing emphasis on sustainable living, opting for environmentally friendly materials is more than a trend—it’s a necessity. Choosing wall cladding DIY options with sustainable certifications or recycled content significantly reduces your carbon footprint, turning a simple renovation into a green act of craftsmanship.
Environmental considerations extend beyond material selection. Proper waste management—recycling packaging and leftover materials—helps minimize landfill contributions and promotes responsible disposal. Additionally, selecting non-toxic adhesives and finishes ensures that your project remains safe for household members and pets, while also safeguarding local ecosystems. Consider using eco-friendly, biodegradable sealants for a healthier indoor environment and to uphold your eco-conscious values.
Safety and sustainability go hand in hand. Always prioritize working in well-ventilated spaces, especially when handling adhesives or paints that release volatile organic compounds (VOCs). Wearing protective gear—gloves, masks, and safety glasses—guards against potential hazards. Remember, your DIY wall cladding adventure should be as safe for you as it is kind to the environment, transforming your walls into a testament to responsible craftsmanship.
0 Comments