
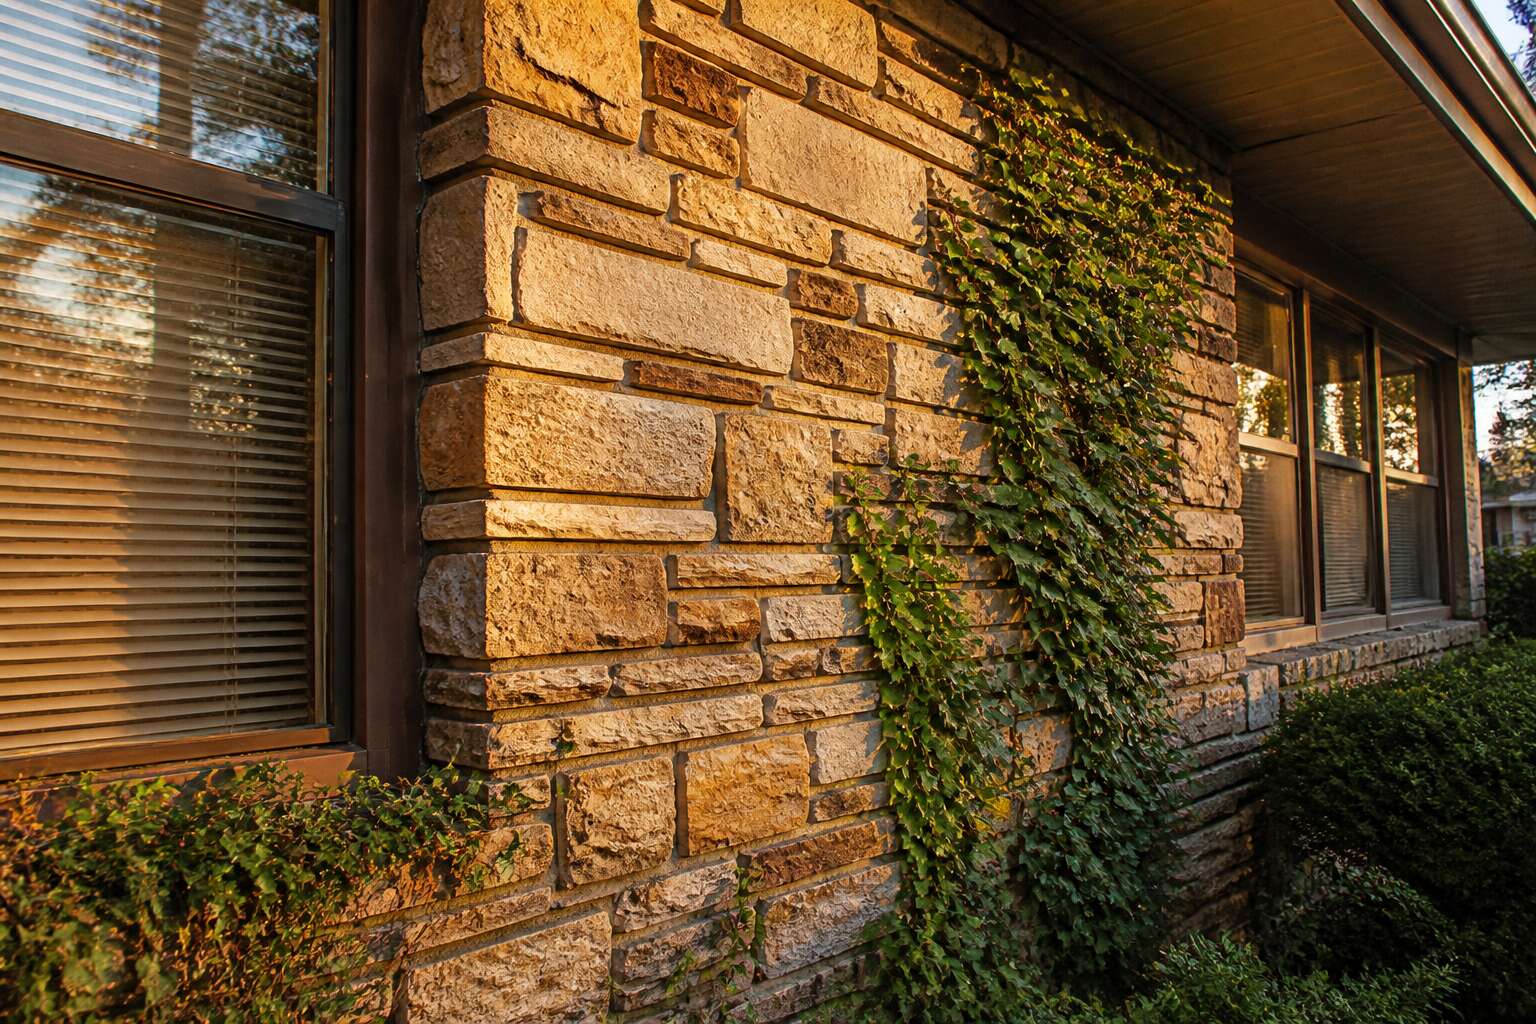
The Timeless Charm of Retro Stone Finishes
Why This Look Endures in Modern Homes
Few architectural trends from the 1980s remain as relevant in the South African home as 80s stone cladding. Its riven texture gives a sense of permanence that modern finishes often do not offer.
Why does this look endure? The answer lies in tactility. Real stone veneer catches light at unexpected angles and hides the scuffs of daily life. Cladding offers:
- Natural insulation that tempers indoor climate
- A durable surface that resists cracks and staining
- Visual weight that anchors open-plan layouts
Homeowners pair this finish with contemporary furniture for a deliberate contrast. In my experience, it works especially well around braai areas and garden walls. It references the past without overwhelming the room!
Signature Textures and Colors of the Era
Riven slate and quartzite defined the texture of 80s stone cladding. Panels split along natural fault lines, leaving undulating surfaces that catch afternoon light differently than any painted wall. Some South African quarries still cut stone with that same rough, honest character.
Era colours leaned toward warmth: honeyed sandstone, burnt ochre, deep charcoal, and weathered rust. These hues come from mineral content, not pigment, so they never fade or peel. I find this palette especially fitting for Free State farms and Johannesburg garden walls. The stone simply stays put, season after season.
How to Mix Vintage Stone with Contemporary Decor
There is a peculiar charm in a wall of 80s stone cladding that survives decades of changing fashion. It does not shout decorative intention. Instead, it suggests the owner has watched a few trends come and go, including the brief reign of chalky face bricks.
Mixing vintage stone with contemporary decor is a social art. I have seen a crisp steel gate do wonders beside a rough stone pillar. Each surface validates the other, and nobody feels the need to apologise for the older material.
- Frame an old stone panel with a dark timber pergola
- Keep neighbouring materials smooth, pale and uncomplicated
- Let the stone shadows do the decorative work
The rough facade supplies the character, modern pieces supply the calm, and that balance keeps retro finishes feeling timeless rather than dated.
The Psychological Comfort of Natural Stone
Walk into a Johannesburg home where the original 80s stone cladding remains, and you feel it immediately. The texture grounds you. Those rough surfaces catch the Highveld light in a way that paint never can, and that visual weight delivers a quiet sense of stability.
Natural stone carries the memory of quarries and geological time. When you touch it, you are touching material that once formed mountain ranges. That permanence offers psychological comfort in rooms where everything else changes quickly.
- The colour variations conceal everyday scuffs and marks.
- The thermal mass moderates indoor temperatures.
- The irregular surface softens sound and reduces echo.
I have watched people run their hands across these walls without realising it. Real stone does not demand attention. It simply holds the space, and that quiet assurance is why 80s stone cladding still feels right.
Sourcing Authentic Materials from the Era
Common Stone Varieties of the 1980s
In 1985, a single pallet of weathered quartzite could define an entire suburban facade. I have seen that look on old Johannesburg homes, and you cannot fake it. For those restoring period houses, sourcing authentic 80s stone cladding demands more than a trip to the nearest builder’s merchant. The original quarries that supplied Cape granite and Natal slate have shifted operations, leaving reclaimed yards and demolition sites as the most reliable repositories.
Common stone varieties of that decade had distinct signatures. The most sought after include:
- Honey-toned sandstone, often sourced from the Free State.
- Blue-grey slate, prized for its fissile layers.
- Rustic quartzite with a natural cleft finish.
Each slab carries the tool marks of the era, something new cladding cannot replicate. When you handle a piece of authentic 80s stone cladding, you touch the same material that weathered decades of Highveld storms. That provenance matters for historical accuracy and for the subtle patina only time can produce.
Spotting Genuine Stone vs. High-Quality Faux
Reclaimed stone yards in Johannesburg report that genuine 80s stone cladding now sells for more per square metre than most new imports. That price gap is not nostalgia. It is scarcity.
Authentic pieces carry evidence of hand splitting and the specific cleft of the original quarry. High quality faux cladding can mimic colour, but it cannot mimic the weight, the fissure lines, or the way water sits on the surface. I have handled both, and the difference is immediate.
When you inspect a slab, check for these signs:
- Natural cleft surfaces with irregular, sharp edges
- Variation in thickness across the face
- Faded or bleached areas where the stone faced the sun
Faux product tends to be uniform. Genuine 80s stone cladding from a demolition site in Durban or Pretoria shows decades of weather, and that history is exactly what a restoration needs.
Where to Find Salvaged Panels and Tiles
Demolition contractors in Johannesburg and Durban are the first stop for genuine 80s stone cladding. These crews strip older houses, and the panels often end up in skip bins unless someone asks for them. A single phone call to a demolition firm can yield entire facades for the price of removal.
Salvage yards in Pretoria and Cape Town hold surprising stock. Many homeowners replaced their original cladding during the 2000s renovation boom, and the removed panels sat in storage. The yards now sell them to restorers and film production houses.
Estate sales are another avenue. Properties in Sandton and Umhlanga still feature the cladding, with cleared homes sending panels through auction houses. Other channels include:
- Online classifieds like Gumtree and Facebook Marketplace
- Building restoration contractors
- Municipal demolition tenders
Quality varies between sources. Panels might carry paint residue or chipped corners, but genuine 80s stone cladding stays intact beneath the weathering.
Restoration vs. Replacement: A Cost-Benefit Analysis
Restoration versus replacement is the question every owner of an original 80s stone cladding facade eventually faces. The cost spread is stark, with full replacement on a Johannesburg property often exceeding restoration by triple or more. This gap drives many homeowners toward repair, yet the decision should rest on more than price alone.
Restoration of authentic 80s stone cladding preserves what new materials cannot.
- Original quarry stone with era specific mineral content
- The original mortar profile and installation geometry
- Architectural continuity with neighbouring period homes
Replacement introduces fresh variables: sourcing, transport, colour matching. In my experience, the clearest path is to assess every panel individually. Heavily damaged units force replacement, but many existing 80s cladding installations retain most panels in salvageable condition. That arithmetic reshapes any renovation budget.
Evaluating Condition and Structural Integrity
Every original 80s stone cladding panel has a specific mineral composition. When sourcing authentic materials from the era, I look for pieces that show genuine age. Salt damage, efflorescence, and spalling are the first indicators to read.
Evaluating condition and structural integrity requires an honest finger on the mortar. It should crumble with pressure, not powder instantly. Check the metal cramps and wall ties behind the stone. Rusted fixings compromise far more than they appear to.
Here is what I inspect on every wall:
1. Micro-cracks around window reveals
2. Displaced panels that have shifted over time
3. Moisture staining that suggests failing damp proof courses
4. Loose bedding mortar that has turned to sand
Matching old quarry stone means comparing edge profiles and undersides as much as the visible faces. Original 80s stone cladding from demolished period homes remains a consistent source for these repairs.
Installation Methods and Critical Considerations
Preparing Surfaces for Old-School Adhesives
When installing 80s stone cladding with original methods, the substrate matters more than the stone itself. Old-school adhesives, often cement-based mortars or solvent-rich mastics, demand a surface that is structurally sound. A dusty or greasy wall compromises the bond within days.
I have seen failed installations where the panels looked perfect but the backing had separated completely. The culprit was almost always inadequate preparation. For South African homes with clay brick or plastered walls, you must check for efflorescence before any adhesive touches the surface. Moisture migrating through the wall pushes salts into the bond line.
Consider these critical steps before mixing a single batch:
- Wire brush the wall to remove loose particles
- Apply a bonding slurry if the surface is smooth or painted
- Test moisture levels with a plastic sheet taped overnight
Each step prevents the adhesive from curing too quickly or delaminating later. Ignoring them turns a straightforward 80s stone cladding project into a recurring maintenance headache.
Fastening Techniques: Screws, Clips, and Mortar
For 80s stone cladding, the fastening method determines whether the wall sags or stands. In South African homes, three methods prevailed: screws through concealed lugs, metal clips gripping panel edges, and a full mortar bed. Each demands a different hand and a different tolerance for error.
Screws and clips suit veneer stone with preformed holes or lipped edges. They let the panel breathe and simplify later replacement. Mortar anchors the stone firmly, but it punishes haste. The substrate must be dampened, the mix kept stiff, and the backing perfectly flat.
- Use stainless steel fixings to prevent rust bleeding across the face
- Leave deliberate gaps between panels for thermal movement
- Check that clip channels align with the metal tracks fixed to the wall
These choices determine the fate of the facade. The 80s stone cladding rewards patience, and patience alone.
Handling Potential Asbestos in Vintage Materials
Before any new panel touches the wall, ask what lies beneath. In South African homes built during the 1980s, asbestos was a common ingredient in backing boards, sealants, and even some adhesive compounds used with 80s stone cladding. Disturbing these materials without testing risks releasing fibres into the air.
Identify the substrate first. If the existing wall has fibrous cement sheeting, or if the old mastic is grey and crumbly, assume asbestos until a laboratory says otherwise. A simple sample test costs little compared with the health consequences of poor handling. The original 80s stone cladding method of buttering the full face of the tile still works, but modern backing boards and polymer-modified adhesives are safer.
- Wear a P3 respirator when dismantling suspect panels
- Spray surfaces with water before cutting to keep dust low
- Wrap debris in sealed plastic sheeting before disposal
Some contractors still wet the wall before applying fresh mastic, a technique that served the era well. Just ensure the wall carries no asbestos dust or old adhesive residue before you start. Protecting the installer matters as much as the final facade.
Upgrading Moisture Barriers and Insulation
Moisture barriers and insulation behind 80s stone cladding often hide a sorry state of torn foil, crumbled foam, and gaps that allow damp ingress. Upgrading these layers changes the wall’s performance. Start by stripping back to the substrate. Inspect the old barrier. If it crackles or peels, remove it. Modern self-adhesive membranes outperform old tar paper. For insulation, closed-cell spray foam beats brittle boards.
When working with this cladding, check thermal bridging through the mortar. A drainage cavity prevents moisture accumulation and protects the interior.
Here is a practical sequence:
- Remove the old barrier completely.
- Install a dimpled drainage membrane.
- Seal all penetrations with butyl tape.
- Choose insulation based on your local climate.
That saves your wall from premature failure and your energy bill from rising.
DIY Pitfalls and When to Call a Pro
Installing 80s stone cladding can save money, but the margin for error is slim. The mortar mix needs the right slump; too wet and panels slide, too dry and they never bond. Hollow spots often appear after a year. A laser level helps, but it cannot compensate for a bowed substrate. I have watched skilled DIYers struggle with this exact problem.
Consider these critical factors before mixing your first batch:
- Check the wall’s load-bearing capacity. 80s stone cladding adds significant weight.
- Verify the substrate is absolutely flat. High spots cause hollow sounds.
- Confirm the ambient temperature stays between 10 and 30 degrees Celsius for proper curing.
When the existing wall leans more than 10 millimetres over two metres, or when you find rotted framing behind the cladding, call a professional. Structural issues are not a weekend project. A pro will also handle flashing details that prevent water from tracking behind the stone, where most DIY failures happen.
Avoiding Common Bonding Failures
Bonding failures in 80s stone cladding rarely announce themselves at the moment of install. They surface months later as a faint rattle. The fix begins with technique. Back-buttering every panel ensures full adhesive coverage. Skip this step, and you trap air that expands and contracts through Johannesburg’s heat cycles.
Choose the trowel notch size carefully. A 10mm square notch suits most cladding, but confirm against the manufacturer’s data sheet. Comb the adhesive in one direction, then set the stone perpendicular to those ridges. This collapses the ridges and eliminates voids.
- Spread adhesive only as wide as you can cover before it skins over.
- Press each panel firmly and twist slightly to seat it.
- Clean the back of each panel to remove dust and loose grit before buttering.
Leave expansion joints at every floor line and corner. Bonding a full wall of 80s stone cladding rigidly from top to bottom guarantees cracks when the building shifts.
Updating and Maintaining Your Vintage Stone Surface
Deep Cleaning and Stain Removal
The 80s stone cladding on your walls has survived decades, yet its original luster often hides beneath grime and stubborn stains. Natural stone is porous, so the wrong cleaner can push dirt deeper. Start with a pH-neutral soap and warm water. Use a soft brush for textured surfaces. For oil-based stains, a poultice of baking soda and water works. Apply the paste, cover with plastic, and let it sit overnight. Rinse thoroughly.
For mineral deposits from hard water, use a diluted acetic acid solution. Always test on an inconspicuous spot first. Regular sealing every two years prevents absorption. If you have polished panels, avoid abrasive pads; they create micro-scratches that dull the finish. Here are steps for a routine deep clean:
- Dust the surface with a microfiber cloth.
- Apply neutral cleaner with a sponge.
- Rinse with distilled water.
- Dry with a chamois.
This method preserves the character of your retro facade without risking damage.
Sealing and Waterproofing Options
The insidious nature of South African humidity finds every microscopic flaw in 80s stone cladding. Sealing is not optional; it is the primary defence against moisture intrusion. Modern penetrating sealers with silane or siloxane outperform the acrylic coatings used in the 1980s. They allow water vapour to escape while blocking liquid water.
Polished panels require a fluorochemical sealer to maintain their original gloss. Heavily textured cladding benefits from an impregnating resin. Consider these attributes when choosing a product:
- pH-neutral and solvent-free formulas for safe application
- Water-based options for easier cleanup
- UV-resistant products for sun-exposed exterior walls
Apply the sealer in thin, even coats. Two thin coats are more effective than one thick application. Allow each coat to fully absorb before wiping off residual product. Reapply every two to three years depending on exposure. This maintenance schedule keeps your 80s stone cladding watertight and visually intact.
Refreshing Grout and Mortar Joints
Grout lines in 80s stone cladding endure harsh Highveld sun and coastal salt. Cracks appear silently. Water follows them.
Old mortar often contains lime. Modern cementitious repair mixes can be too rigid. They stress the surrounding stone. A flexible, polymer-modified grout is safer.
- Loose material often hides beneath intact-looking joints
- Dust must be removed before fresh mortar bonds
- Oxide pigments replicate the original colour without artificial dyes
Match the joint profile to the era. Raked and flush joints look authentic. Deep V-grooves do not.
Creative Inspiration for Using Retro Stone in Your Home
Feature Walls That Define a Room
Feature walls carry the burden of a room’s first impression. One panel of 80s stone cladding on a single plane changes how light falls across a space, creating shadows that shift through the day. The raw, uneven surface draws the eye without demanding attention.
Consider the wall behind a freestanding bathtub. The stone’s muted beige and grey tones anchor the area, making the room feel grounded. Or place it along a hallway leading to a study, where the texture signals a transition from public to private space.
For a distinctive approach:
– Use stacked panels vertically to create a ribbed effect
– Pair a single section with a smooth limewash finish on the other walls
– Let the stone stop at midpoint, allowing the upper wall to recede
The success of 80s stone cladding rests on restraint. One wall, properly lit, defines the room’s character completely.
Kitchen Islands and Backsplashes
“A kitchen should feel like it has been used for years,” says architect Sarah Ncube. 80s stone cladding achieves that sensation through texture alone. I have wrapped one side of an island with beige panels, leaving the other surfaces clean.
For backsplashes, think in fragments. A single course of stone behind the stove reduces monotony. The material’s natural irregularities hide fingerprints and cooking splashes! Some kitchens run vertical panels from counter to cabinet.
These applications let the retro texture coexist with modern appliances. The kitchen gains a sense of permanence.
Exterior Entrances and Accent Panels
An entrance is a threshold, a passage between worlds. 80s stone cladding transforms that crossing into something older, almost geological. I have seen a single column wrapped in honeyed quartzite make a modern facade feel like a relic. The texture absorbs light, casting long shadows that shift with the sun.
For accent panels, think in fragments rather than full coverage. A narrow band beside a door, a low plinth under a window. The effect is subtle. The stone does not shout!
Consider these placements:
- A single pillar beside the front gate
- A recessed panel in the porch wall
- A short run under a bay window
Each placement gives the exterior a narrative, a sense of having endured decades. The 80s stone cladding becomes a quiet anchor in the passage of time.
Cozy Fireplace Surrounds
Fireplaces hold a quiet gravity. The uneven faces and earthy tones of 80s stone cladding give a simple hearth a sense of permanence. The shadows it casts at dusk are deep, almost secretive!
The stone’s character determines the room’s mood. The options vary by texture and tone:
- Rough split-face for drama
- Water-worn pebbles for softness
- Cut slabs for clean lines
Each selection changes the psychology of the space. A lighter touch uses a single course of stone above the mantel. The contrast creates a sense of age and renewal. Even a thin band of stone above the firebox anchors the whole wall.

0 Comments